
© Original Recipe By Hollywood Recipes ©
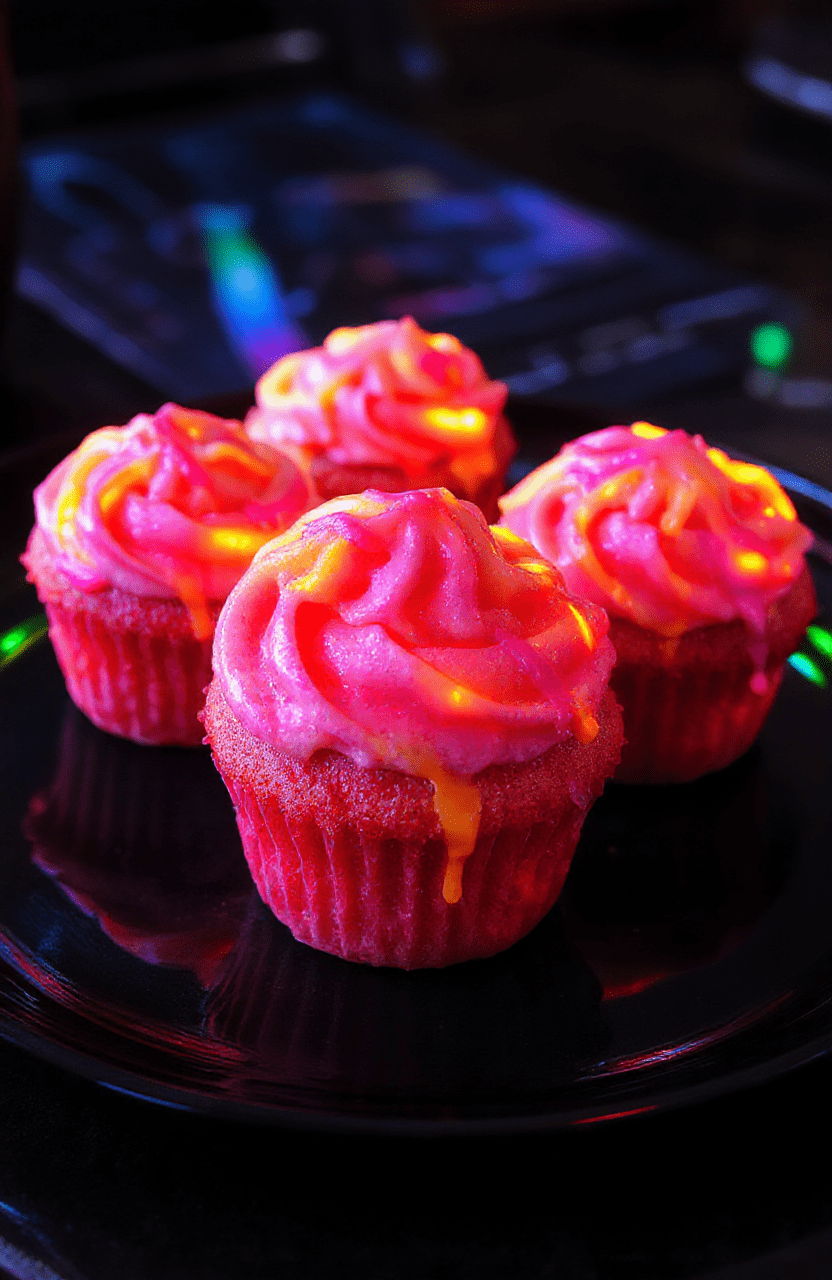
🎤✨ Billie Eilish Holiday Neon Cupcakes: A Bright & Colorful Festive Treat 🎉🌈
1. Introduction
If you’re looking to add some vibrant flair to your holiday celebrations, these Billie Eilish Holiday Neon Cupcakes are the perfect choice. Bursting with luminous colors, these bright cupcakes will be the hit of any party. Their eye-catching appearance pairs perfectly with the playful, edgy vibe that Billie Eilish is known for. Not only do they look stunning, but they also taste as delightful as they look, making them a must-try for your festive baking lineup.
2. Why You’ll Love This Recipe
- Ready in about 45 minutes, perfect for last-minute parties
- Compact and fun to decorate, engaging kids and adults alike
- Uses natural food coloring for a safe, luminous effect
- Flexible for experiments with different color schemes and flavors
3. Ingredient Notes
Choosing high-quality ingredients really elevates this recipe. Use fresh, organic eggs and butter for a rich, tender crumb. To achieve that vibrant, luminous glow, you’ll incorporate natural food colorings or high-intensity gel dyes, which concentrate the colors without watering down your batter. The flavorings—vanilla, lemon, or even coconut—are customizable to match your color theme, adding an extra layer of deliciousness to these colorful cupcakes.
4. Kitchen Tools You Need
To bring these vibrant cupcakes to life, certain tools make the process smoother. A high-quality muffin tin ensures even baking and perfect cupcake shapes. Use a piping bag with different nozzle tips to create bold, eye-popping icing designs. For mixing, a reliable electric hand mixer is a game-changer, ensuring your batter is smooth and fluffy.
5. How to Make Billie Eilish Holiday Neon Cupcakes
Step 1: Prepare the Batter
Start by preheating your oven to 350°F (175°C). In a large mixing bowl, cream together butter and sugar until light and fluffy—this should take about 3 minutes and fill your kitchen with a sweet aroma. Beat in eggs one at a time, then stir in vanilla or your preferred extract. Gradually add in sifted flour, baking powder, and a pinch of salt, mixing until just combined.
Step 2: Add the Colors
Divide the batter into several bowls based on how many neon shades you’re aiming for. Add your gel food colors or natural dyes to each bowl, stirring gently to achieve bright, vibrant hues—think electric pink, lime green, and neon blue. Pour each colored batter into separate piping bags or scoops and layer them into your cupcake liners for a marbled, luminous effect.
Step 3: Bake and Cool
Bake for 18-20 minutes, or until a toothpick inserted in the center comes out clean. Once baked, transfer the cupcakes to a wire rack and let them cool completely—this prevents the colors from bleeding into the frosting later.
Step 4: Decorate
Prepare a fluffy buttercream frosting tinted with contrasting colors. Use piping bags fitted with star or round tips to create bold, swirl patterns. Finish with edible glitter or neon sprinkles to amplify the luminous effect. Your cupcakes will look like they belong on a pop concert stage!
6. Expert Tips for Success
For the most vibrant colors, use gel food dyes instead of liquid, as they provide richer pigmentation without thinning your batter. Also, avoid overmixing once you add the flour—this keeps your cupcakes tender. Keep cupcakes away from direct sunlight for long periods to preserve the bright, luminous appearance. Lastly, refrigerate decorated cupcakes if you plan to serve them later; just bring them to room temperature for that perfect melt-in-your-mouth texture.
7. Variations & Substitutions
If you’re vegan or dairy-free, substitute butter with coconut oil and eggs with unsweetened applesauce or commercial egg replacer. For gluten-free options, swap the all-purpose flour for a certified gluten-free blend. You can also experiment with different flavor extracts like strawberry or mint to customize your luminous cupcakes for any holiday theme.
8. Storage & Reheating
Store leftovers in an airtight container at room temperature for up to two days. For longer storage, refrigerate for up to five days, but remember to bring the cupcakes back to room temperature before serving to regain their original vibrant look and soft texture. These cupcakes also freeze well—wrap individually in plastic wrap and store in a freezer-safe container for up to a month.
9. FAQ
Q: Can I make these neon cupcakes ahead of time?
A: Absolutely! Bake and decorate them ahead of schedule. Just keep them stored properly, as described, to maintain their vivid colors and freshness.
Q: How do I ensure the colors stay bright after baking?
A: Use gel or powdered food dyes, and avoid overbaking. Once cooled, add a layer of bright frosting and edible glitter for maximum luminous effect.
Q: Are these cupcakes suitable for kids’ parties?
A: Yes! Their vibrant colors and fun presentation make them a favorite among children. Plus, you can customize the colors to match any party theme.
10. Conclusion
These Billie Eilish Holiday Neon Cupcakes are a playful, colorful twist on traditional holiday treats. With their luminous, eye-catching appearance and adaptable flavors, they’ll bring excitement and artistic flair to your festive table. Get creative with the colors and enjoy the process of baking and decorating these bright cupcakes—your guests will love the show-stopping results!
Print
Billie Eilish Holiday Neon Cupcakes
Festive neon cupcakes with vibrant glowing icing, perfect for holiday celebrations or themed parties, topped with colorful sprinkles for an extra pop.
- Total Time: 40 minutes
- Yield: 12 cupcakes
Ingredients
- 1 1/2 cups all-purpose flour
- 1 cup granulated sugar
- 1/2 cup unsalted butter, softened
- 2 large eggs
- 1/2 cup milk
- 2 teaspoons baking powder
- 1 teaspoon vanilla extract
- Neon food coloring gels (blue, pink, green)
- Glow-in-the-dark or UV-reactive icing
- Sprinkles and edible glitter
Instructions
- Preheat oven to 350°F (175°C). Line a muffin tin with colorful cupcake liners.
- Mix flour, baking powder, and set aside.
- Cream butter and sugar until light and fluffy. Add eggs one at a time, then vanilla.
- Gradually add dry ingredients alternately with milk, mixing until smooth.
- Divide batter into bowls and tint with neon food coloring gels.
- Pour batter into liners and bake for 18-20 minutes. Cool completely.
- Decorate with glowing icing and sprinkles. Use a small brush or piping to add glow-in-the-dark effects.
Notes
- Use neon gel food coloring for vibrant shades.
- Glow-in-the-dark icing can be enhanced with UV light for best effect.
- Customize with different colors for a dynamic look.
- Prep Time: 20 minutes
- Cook Time: 20 minutes
- Method: Baking, decorating
- Cuisine: Festive, modern
- Diet: Vegetarian
Nutrition
- Serving Size: 1 cupcake
- Calories: 210 Kcal
- Sugar: 15g
- Sodium: 120mg
- Fat: 10g
- Saturated Fat: 6g
- Unsaturated Fat: 4g
- Trans Fat: 0g
- Carbohydrates: 28g
- Fiber: 1g
- Protein: 3g
- Cholesterol: 45mg
