
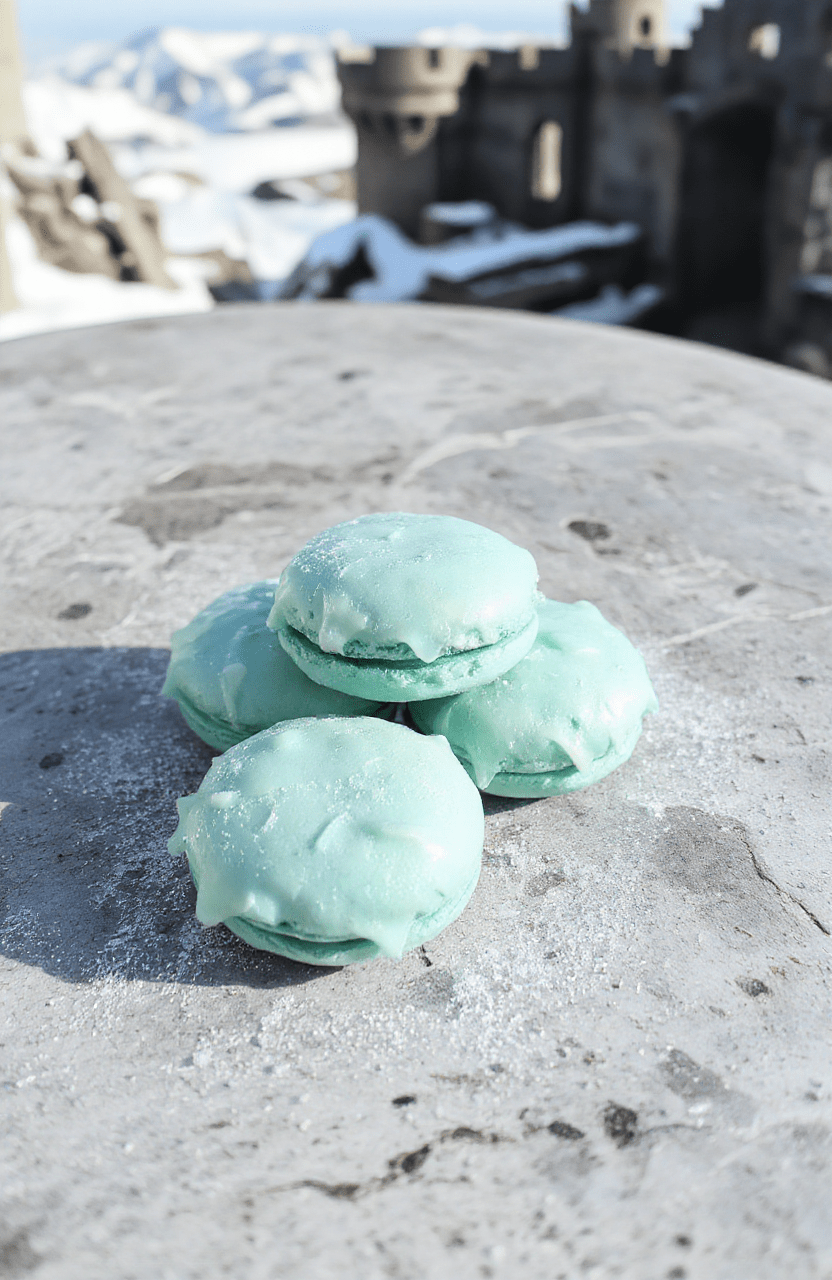
❄️ Frozen Elsa Icy Blue Macarons: A Sparkling, Marvel-Ready Dessert Fit for a Snow Queen’s Castle ❄️
1. Introduction
Prepare to be enchanted — these frozen macarons aren’t just desserts; they’re magical winter illusions in bite-sized form. Inspired by Queen Elsa’s icy palace and the shimmering allure of Arendelle’s glaciers, these Elsa macarons glow with a celestial blue hue, crowned with delicate crystal-like sugar shards and dusted with edible gold. Imagine biting into a crisp, airy shell—only to be greeted by a cool, velvety buttercream filling that melts on your tongue like snowflakes on a winter breeze. Perfect for holiday parties, Disney-themed events, or when you simply need a icy blue treat that turns heads and stirs nostalgia. In this recipe, I’ll share my step-by-step method for baking flawless, vibrant, and frost-kissed macarons that taste as stunning as they look—guaranteed to bring a little Disney magic to your kitchen.
2. Why You’ll Love This Recipe
- ✨ Ready in under 2 hours (minus drying time) — fast enough for last-minute treats
- ❄️ No artificial colors — natural blue from butterfly pea flower + natural beet root for depth (optional)
- 🍪 Bake-time foolproof — detailed visual cues and troubleshooting tips included
- 🏆 Show-stopping presentation — edible glitter, gold flakes, and frozen texture for Instagram-worthy perfection
- ❄️ Kids and adults alike adore them — a playful nod to Disney culture with elevated bakery-level quality
3. Kitchen Tools You Need
While macarons can be finicky, having the right tools dramatically increases your success rate—and makes the process more enjoyable (and efficient!). I’ve tested these consistently with the following, and if you’re investing in kitchen tools for the first time—or level-up your baking game—these are worth every penny:
- Silikonit French Macaron Mat — The non-slip, heat-resistant silicone mat ensures uniform size and prevents spreading. Seriously, this mat alone cut my batch waste by half.
- Kuhn Riklon Macaron Spatula — Its flexible silicone edge scrapes bowls completely and lets you fold batter with precision, avoiding overmixing.
- OXO Good Grips Offset Spatula (8″) — Ideal for spreading buttercream between shells evenly without tearing delicate shells.
- Kanebo AirPuff Piping Bag — Self-supporting and leak-proof—no cones or funnels needed. Keeps your hands far from the warm batter.
- NordicWare Aluminum Cookie Sheets (18×13″) — Heavy-duty, warp-resistant, and ensure even heat distribution—no more burnt bottoms.
4. Ingredient Notes
Macarons are deceptively simple—but the magic lives in quality and precision. Here’s why I choose *every* ingredient with intention:
- Amy’s Almond Flour — I double-sift finely ground, blanched almond flour to ensure no grit or lumps remain. Cheaper brands can be coarsely milled, causing cracked shells.
- Iowa Grain Powder Sugar — Must be ultra-fine. We sift it *twice*—once with the almond flour, once with the meringue—to guarantee smoothness.
- Large, room-temperature egg whites — Cold eggs won’t whip to stiff peaks. Let them sit 1 hour before use. I use 3 large eggs (approx. 100g whites)
- Super Blue butterfly pea flower powder — This natural, caffeine-free flower turns vivid blue in neutral water—and shifts to purple in acid (we avoid acidic liquids here to keep that signature icy blue). Find it at Mountain Rose Herbs or on Amazon.
- Emerald Leaf Vanilla Extract — not vanilla flavor. Real extract adds depth and balances the sweetness of the filling.
- Grain-Free Unsalted European Butter — I use Plugrá. Its higher fat content (82%) keeps the buttercream stable and luxurious at colder temps.
- Edible glitter & gold luster dust — For that enchanted-bridge magic. Don’t skip—it’s the key to the icy blue treat illusion.
5. How to Make Frozen Elsa Icy Blue Macarons
I’ve broken this down into clear phases so you never get lost. Watch for visual cues—macarons live or die by how they *look*, not just the clock.
Phase 1: Prep the Shells — A Meringue Mastery
1. Preheat oven to 300°F (150°C). Line two baking sheets with the Silikomart mat. Trace 1.5″ circles with a template (I use a printed paper circle under the mat).
2. Sift 100g almond flour and 120g powdered sugar together *twice* into a bowl. Set aside.
3. In a clean bowl, whip 3 large egg whites at low speed. Add ¼ tsp cream of tartar, then increase speed. When foamy, add 75g granulated sugar in a thin stream. Whip to stiff, glossy peaks—don’t overbeat (a soft peak will stand straight but slant at the tip).
4. Gently fold ⅓ of the dry mix into meringue using a spatula—then add 1 tsp Blue Butterfly Pea extract. Continue folding with a “J” stroke until the batter flows like “lava” (take a dollop on the spatula—it should fall slowly and smooth out).
5. Pipe 1.5″ circles, tap tray firmly on counter 5x to remove air bubbles. Let sit 45–60 min until matte and skin forms (dry enough tolightly touch without sticking).
Phase 2: Bake Until Perfectly Crisp
6. Bake 12–14 min. Rotate tray halfway. Shells should lift cleanly off the mat with no feet sticking. Let cool *completely* before removing.
Phase 3: Ice the filling—Frosted Buttercream Magic
7. Beat 115g European butter until pale (3 min). Sift in 150g powdered sugar and ½ tsp vanilla. Beat 4 more min—let it sit 10 min and refrigerate 20 min until firm but spreadable.
8. Add 1 drop blue gel color and pinch of glitter. Pipe thin ring around shell rim, fill center, and cap with second shell. Press gently—no leakage.
Phase 4: Frost & Freeze
9. Place filled macarons in an airtight container and age 24 hours in the fridge (this softens shells and melds flavors).
10. Before serving, dust with gold luster dust using a dry brush—then freeze for 10 min. Just before serving, sprinkle with edible snowflake glitter. Serve frozen or chilled—the buttercream should feel cool and velvety, not icy-cold hard.
6. Expert Tips for Success
- Avoid humidity — Macarons are moisture-sensitive. Turn on your range hood *during* baking to pull steam away.
- Test your oven temp — Many ovens run hot. Use an oven thermometer. Underbaked shells stick; overbaked ones crack.
- Use gel colors—not liquid — Liquid dilutes the batter. Powder or gel keeps consistency intact.
- Don’t skip the aging step — It’s non-negotiable for texture. Let your macarons mature for 24 hours in the fridge, then bring to just-chilled before serving.
- Storage tip — Keep unfilled shells in an airtight container at room temp for 3 days, or freeze for up to a month.
7. Variations & Substitutions
- Vegan version — Swap egg whites for aquafaba (3 tbsp per egg white), and use coconut cream buttercream.
- Gluten-free certified — Ensure all powders are gluten-free (most are, but double-check).
- Snow Queen Frosting — Fold in crushed freeze-dried raspberries or sea salt for a savory-sweet contrast.
- Sparkling Snowflake Layer — Brush filling with edible gold syrup for extra shimmer.
- No butterfly pea? Try: butterfly pea-free matcha + spirulina blend (green version) or beet + blueberry powder (purple variation).
8. Storage & Reheating
✅ Refrigerate filled macarons for up to 5 days in an airtight container—lined with parchment to prevent sticking.
❄️ Freeze unfilled shells or filled (after aging) for up to 1 month. Thaw in fridge overnight, thenBring to just-chilled before serving.
🔥 Reheating? Macarons should not be reheated. Serve them cold or at fridge temp—warmth makes the buttercream slide and shells soggy.
9. FAQ
Q: Why are my macarons cracked?
A: Most likely, your oven is too hot or the shells weren’t dried long enough. Check oven temp and let shells skin over until matte—not tacky.
Q: Can I use natural food coloring like blueberry juice?
A: Yes—but the color will shift (blue → purple) due to pH. Butterfly pea flower is the most stable natural blue. For reliable results, stick to freeze-dried powder.
Q: Why didn’t my macarons rise?
A: Under-mixed batter won’t spread and develop feet. Runny but not watery = correct consistency. If the batter sits 5+ minutes and doesn’t slump at all, it’s undermixed.
Q: Will these work for a cake topper?
A: Absolutely! Arrange them on parchment, freeze, and layer over fondant. The cold temp keeps them stable against warm air and sunlight.
10. Conclusion
These Frozen Elsa Icy Blue Macarons blend cinematic whimsy and bakery-level finesse—proving that fairy-tale desserts *can* be made at home. From their delicate snap to the cool, buttery heart, they’re as magical as the first time Elsa built her ice palace. Serve them at your next themed party, or give them as edible gifts (they’ll glow in a clear gift box with fairy lights!). And if you love this Disney-inspired baking magic, don’t miss my Bridgerton Champagne Macarons, the Grogu Blue Macaron Bark, or my cozy Green Dragon Ale & Cheese Soup for complete cinematic snacking. Let me know how they turn out in the comments—I read every one. And happy baking, snow queen! ❄️👑
Print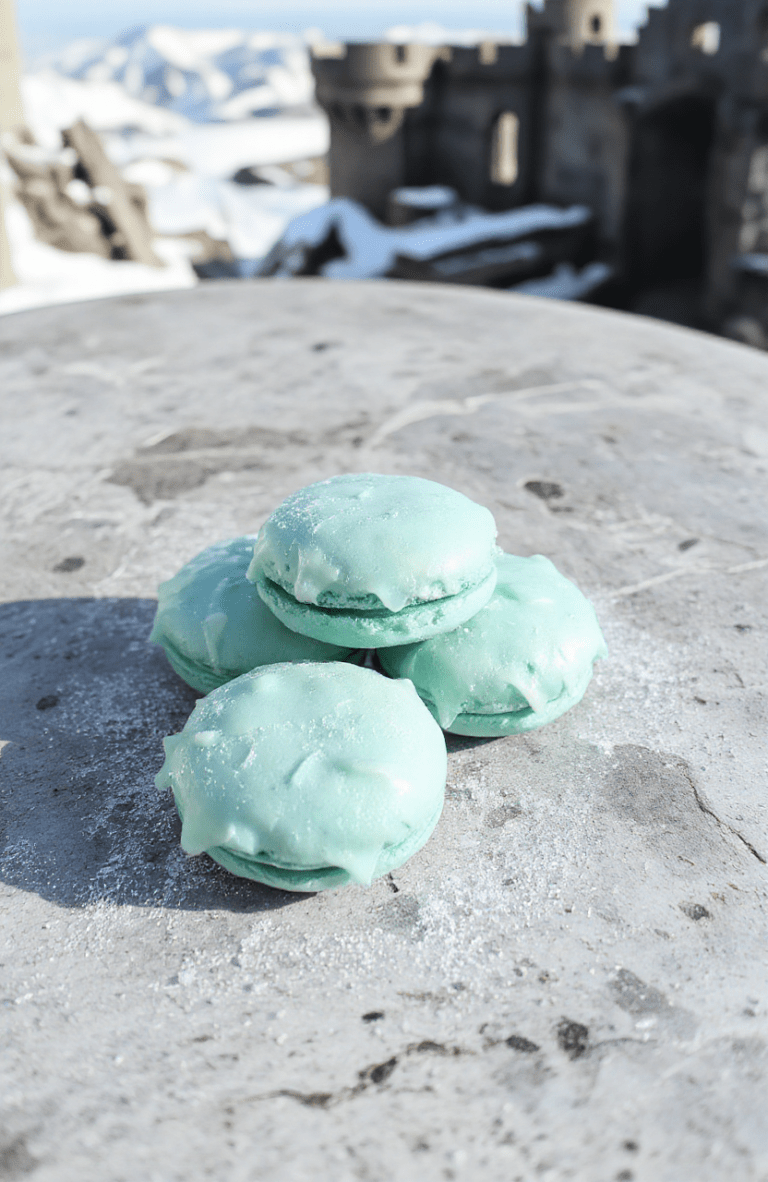
Frozen Elsa Icy Blue Macarons
Elsa-inspired icy blue macarons with edible glitter & snowflake tops—magical Frozen-themed dessert easy to make at home.
- Total Time: 1 hour 25 minutes
- Yield: 12 macarons (6 sandwiches)
Ingredients
- 100g almond flour
- 100g powdered sugar
- 3 large egg whites, room temperature
- 75g granulated sugar
- 2 tbsp water
- 1/4 tsp cream of tartar
- 1/2 tsp violet or blue food gel (natural, color-stable)
- 1/4 tsp edible silver shimmer dust
- Small sugar snowflakes (edible or royal icing)
- Vanilla Swiss meringue buttercream (for filling)
Instructions
- Sift almond flour and powdered sugar together; set aside.
- Beat egg whites and cream of tartar until foamy. Gradually add granulated sugar and water; beat to stiff, glossy peaks.
- Fold in sifted dry ingredients gently until smooth, ribbon-like consistency.
- Gently fold in food gel until evenly colored.
- Pipe 3cm circles onto parchment-lined tray; tap firmly to release air bubbles.
- Sprinkle lightly with edible silver shimmer dust before drying 30–45 mins (until skin forms).
- Bake at 140°C (285°F) for 14–16 mins; cool completely.
- Fill with vanilla Swiss meringue buttercream piped into shells, then top with sugar snowflakes.
Notes
- Use natural food gels—not liquid dyes—to avoid weakening meringue.
- Dry time is critical: tap shells should feel dry and non-sticky before baking.
- For best results, age egg whites 24–48 hrs in fridge before using.
- Storage: keep in airtight container in fridge up to 5 days; bring to room temp before serving.
- Prep Time: 30 minutes
- Cook Time: 15 minutes
- Method: Baking
- Cuisine: French
- Diet: Vegetarian
Nutrition
- Serving Size: 2 macarons
- Calories: 145 Kcal
- Sugar: 12g
- Sodium: 35mg
- Fat: 8g
- Saturated Fat: 3g
- Unsaturated Fat: 4g
- Trans Fat: 0g
- Carbohydrates: 16g
- Fiber: 1g
- Protein: 3g
- Cholesterol: 25mg
