
🧱 The Ultimate Game of Thrones Direwolf Bread Loaves 🐺🔥
1. Introduction
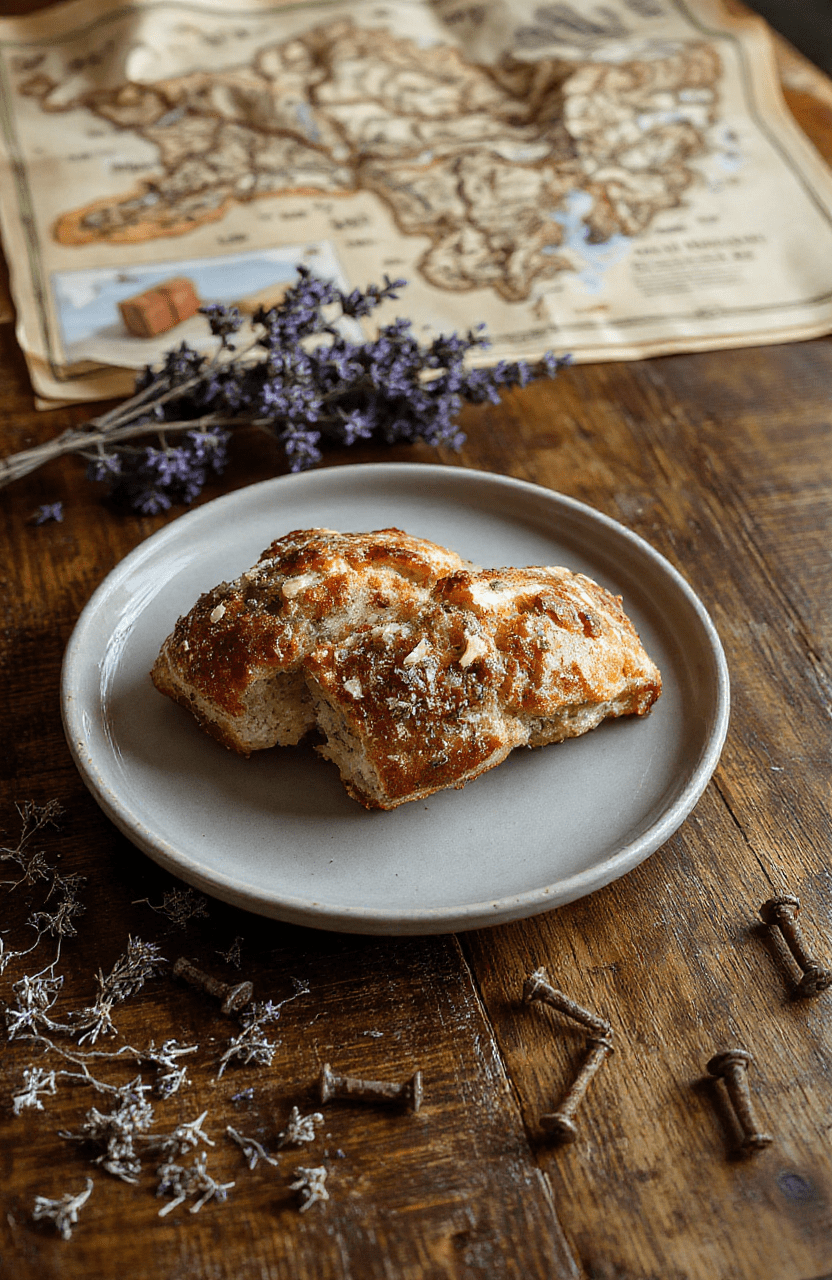
Ready to bring the wild, untamed spirit of Winterfell to your kitchen? These Game of Thrones direwolf bread loaves are more than just a nod to your favorite HBO epic—they’re rich, rustic, and deeply satisfying, with a crust that crackles as it cools and a tender interior that smells like a campfire under Northern stars.
Hand-shaped, scored like a direwolf’s profile, and brushed with garlic-herb butter, this Westeros bread recipe captures the heart of Northern cooking: hearty, unpretentious, andunforgettably flavorful.
Whether you’re hosting a Game of Thrones watch party, celebrating Book Day, or just craving bread that tells a story, this loaf earns its place at your table.
2. Why You’ll Love This Recipe
- ✅ Visually stunning with authentic direwolf-inspired scoring—turns heads at any table
- ✅ Authentic flavor: a blend of bread flour, malt powder, and warm spices evokes old-world Northern bakeries
- ✅ Versatile & satisfying: pairs perfectly with stews, soups, or just slathered in butter
- ✅ Dairy-free & vegan-friendly with simple swaps
- ✅ Great for meal prep: stays fresh for 4 days or freezes beautifully
3. Kitchen Tools You Need
To achieve professional-quality loaves with clean scoring and perfect rise, invest in tools designed for precision and durability:
For bakers who love versatility and space-saving convenience, the Compact 6-in-1 Digital Air Fryer by Amazon Basics is a great sidekick for toasting bread crumbs or quickly reviving stale loaves. (Yes—we use air fryers for more than just fries!)
If you’re serious about your craft, a T-fal 14-Piece Hard Anodized Nonstick Cookware Set ensures even heat distribution for any pot, pan, or dutch oven you pair with this recipe.
For hands-off proofing and precision crust development, the Ninja Foodi Smart XL Indoor Grill & Air Fryer Combo can replicate wood-fired ovens with steam and crisp functions.
Thinking bigger? The Breville Nespresso Vertuo Creatista Espresso & Coffee Maker is ideal for your post-bake latte ritual—because no direwolf loaf is complete without a strong brew.
For serious bakers, the KitchenAid Artisan 5-Quart Stand Mixer in Scorched Orange handles this dough with grace, freeing your hands for scoring and shaping.
And for storing your cooled loaves (yes, they’ll go fast), the JoyJolt Airtight Glass Food Storage Set keeps bread fresh without plastic odor leakage.
4. Ingredient Notes
You don’t need ancient Westerosi alchemy—but smart ingredient choices make the difference between *okay* and legendary direwolf bread:
- Bread flour (not all-purpose): higher protein ensures a chewy crumb and strong rise—critical for tall, sculpted loaves.
- Diastatic malt powder: optional but *highly* recommended. It boosts browning, enhances maltiness, and improves texture (think: artisan bakery quality).
- Stone-ground rye flour: adds mild earthiness—subtle but important for depth. Think wild northern grains.
- Sea salt flakes: coarse salt creates a delicate crust crunch and intensifies flavor contrast.
- Fresh rosemary & thyme: these herbs are traditional in the North. Dried works in a pinch, but fresh oils bloom when brushed on warm bread.
- Warm water (105°F): lukewarm, not hot—too hot kills yeast and ruins proofing.
Pro tip: For extra richness, swap ¼ cup of water for milk or oat milk (try Carote Premium 16pc Nonstick Cookware Set for gentle stovetop warming).
5. How to Make Direwolf Bread Loaves
Phase 1: Mixing & Autolyse (15–20 min)
Whisk together 450g bread flour, 50g rye flour, 2g diastatic malt powder, and 10g salt in your mixing bowl. Add 350g warm water and stir until no dry flour remains.
Let rest (autolyse) for 15–20 minutes—this relaxes the gluten and lets the flour fully hydrate. Visual cue: mixture looks shaggy, cohesive, and slightly sticky.
Phase 2: Yeast Incorporation & Stretch & Fold
Dissolve 5g active dry yeast in the remaining 25g warm water. Add to the dough and mix until just combined. Cover and let rest 30 minutes.
Now, perform 4 sets of stretch-and-folds: every 30 minutes, gently grab one edge of the dough, stretch upward, and fold over itself. Rotate bowl and repeat 3x. After 2 hours, your dough will be smooth, elastic, and tacky—but not overly sticky.
Phase 3: Bulk Fermentation (1½–2 hours at room temp, then fridge)
Shape dough into a round, seam-side up. Place in a floured bowl, cover, and let rise at room temp for 1½–2 hours (until puffy and slowly jiggly). Then refrigerate overnight—this cold proof develops complex flavor and tightens the crumb for slicing.
Phase 4: Shaping & Scoring the Direwolf Profile
Turn proofed dough onto a lightly floured surface. Gently deflate, shape into a round batard, then seam-side down on a parchment-lined peel.
Scoring is key: With a razor, make three diagonal slashes along the center—like a direwolf’s snout. Add two small “eyes” above the tip, and a curved “mouth” near the end. (Pro tip: Dust with flour and scrape flour off to enhance contrast.)
Phase 5: Baking (Steam = Crackle)
Preheat your oven to 475°F (245°C) with a Dutch oven inside for 45 minutes. Carefully transfer dough (on parchment) into the pot, cover, and bake 20 minutes.
Uncover, reduce heat to 425°F (220°C), and bake 25–30 more minutes until deep golden brown (internal temp: 205–210°F).
Brush immediately with melted butter infused with minced garlic, rosemary, and thyme. Let cool 45+ minutes before slicing—patience is adirewolf virtue.
6. Expert Tips for Success
- 🔥 Use a scale: Bread baking is science. Volume measurements cause inconsistency.
- ❄️ Cold proofing is non-negotiable: Overnight bulk fermentation builds flavor and improves texture.
- 🧊 Cold Dutch oven trick: Don’t preheat with nothing inside—always have vessel + lid preheated for steam.
- 🖌️ Score deeply, not too close: Shallow slashes close up; too deep makes the loaf collapse. Aim for ½-inch depth, ½-inch from edge.
- 🧂 Salt after autolyse: Adding salt too early can inhibit yeast. Delay until after hydration.
- 🍃 Herb butter brush warm, not scalding: Hot butter wilts herbs and burns. Melt, cool 2 minutes, then stir in fresh herbs.
7. Variations & Substitutions
These loaves adapt beautifully—let your culinary house flourish:
- 🌱 Vegan: Swap butter for melted coconut oil; use maple syrup instead of honey in starter (if using).
- 🌾 Sourdough version: Replace yeast with 100g active sourdough starter + 50g flour + 50g water. Ferment 4–6 hours at room temp before cold proof.
- 🌰 Nutty variation: Fold in 50g toasted pumpkin seeds or cracked walnuts during final fold.
- 🔥 Spicy Northern style: Add 1 tsp smoked paprika + ½ tsp cayenne to dry ingredients for a bold heat.
- 🍬 Sweet direwolf: Omit rosemary, add 30g brown sugar + zest of 1 orange for a breakfast loaf (served with honey butter).
8. Storage & Reheating
Cool completely before storing:
- Room temp (2 days): Wrap in clean kitchen towel or store in joyJolt glass containers.
- Fridge (4 days): Slice and reheat to avoid drying.
- Freezer (up to 3 months): Wrap in foil + plastic, slice before freezing. Toast straight from frozen.
>To revive, spritz crust with water, wrap in foil, and bake at 350°F for 10–12 minutes—or air fry at 320°F for 4 minutes.
9. FAQ
Can I make these gluten-free?
Yes—but expect a denser crumb. Use 1:1 gluten-free flour blend (like King Arthur), add 1 tsp xanthan gum, and increase water by 10%. Bake in a loaf pan for structure.
Why did my loaf flatten during scoring?
Most likely: under-proofed dough lacks strength to hold shape. Or: scoring too shallowly/late. Make sure your oven is fully preheated, and slash quickly while steam is high.
What can I serve this bread with?
Classic pairings: hearty beef stew, roasted garlic dip, salted honey butter, or a simple seafood chowder. For a Westerosi feast, pair with fantasy-themed sweets after.
My crust isn’t crackly—what’s wrong?
Lack of steam. Try this hack: place a shallow pan on the bottom rack while preheating, and pour 1 cup boiling water into it before closing the oven door. Or use a Dutch oven as directed.
10. Conclusion
These Game of Thrones direwolf bread loaves are more than a recipe—they’re an experience. With a crackling crust, a deeply aromatic interior, and storytelling flair, they’ll have your guests shouting “Winter is coming” before they even bite in.
Don’t forget to save your fork marks (or knife scores!) for next time. Whether you serve them at your Thrones marathon, a fantasy birthday, or just a cozy Tuesday, let the North inspire your kitchen.
Love this recipe? Share your direwolf creation with #DirewolfBread on social—and let the House Stark baker in you shine.
Print
Game of Thrones Direwolf Bread Loaves
These iconic Direwolf Bread Loaves are shaped like the beloved Stark family direwolves — a fan-favorite Game of Thrones edible centerpiece. Rich, rustic sourdough bread forms the body, with almond slices for eyes and careful scoring to mimic fur texture. Perfect for themed parties, movie nights, or as a show-stopping centerpiece.
- Total Time: 28 hours 10 minutes
- Yield: 2 loaves
Ingredients
- 500g strong bread flour
- 350g lukewarm water
- 120g active sourdough starter (100% hydration)
- 10g fine sea salt
- 2 tbsp olive oil, plus extra for brushing
- 24 whole almonds, for eyes (optional)
- Fresh rosemary sprigs, for garnish
- Flaky sea salt, for finishing
Instructions
- Mix flour, water, and starter in a large bowl until combined. Let rest 30 min (autolyse).
- Add salt and knead for 8–10 min until smooth and elastic.
- Transfer to oiled bowl, cover, and ferment at room temp for 4–5 hours, until doubled.
- Shape dough into two oval loaves. Use a bench scraper or sharp knife to cut shallow fur-line grooves along the length.
- Shape each loaf into a howling direwolf: taper one end to a snout, add two almond “eyes” (press gently). Place on parchment-lined baking sheet.
- Cover and cold-proof in fridge overnight (or 2 hours at room temp).
- Preheat oven to 450°F (230°C) with Dutch oven inside.
- Score top of each loaf lengthwise with 3–4 shallow cuts for “mouth” opening.
- Transfer loaves (on parchment) into hot Dutch oven, cover, bake 20 min.
- Uncover, reduce heat to 425°F (220°C), bake 25–30 more min until deep golden and internal temp reaches 205–210°F (96–99°C).
- Brush with olive oil, sprinkle with flaky salt and rosemary. Cool completely before serving.
Notes
- For a quicker version, use 225g commercial yeast (7g active dry) in place of sourdough starter, reducing first rise to 1–2 hours.
- Almond eyes are optional — you can use black sesame seeds or simply press indentations with a paring knife.
- Best served warm or sliced and toasted. Stores well in an airtight container for up to 3 days.
- Prep Time: 20 minutes
- Cook Time: 50 minutes
- Method: Baking
- Cuisine: Fantasy Westerosi
- Diet: Vegetarian
Nutrition
- Serving Size: 1 slice (per loaf)
- Calories: 130 Kcal
- Sugar: 1g
- Sodium: 220mg
- Fat: 2.5g
- Saturated Fat: 0.5g
- Unsaturated Fat: 1.8g
- Trans Fat: 0g
- Carbohydrates: 25g
- Fiber: 3g
- Protein: 5g
- Cholesterol: 0mg
