
© Original Recipe By Hollywood Recipes ©
👻🧠 Wednesday Lurch’s Melted Brain Dip: The Creepiest Halloween Party Snack!
1. Introduction
If you’re planning a spooky Halloween party, no dish captures the essence of creepy elegance like Wednesday Lurch’s Melted Brain Dip. This gross Halloween party dip isn’t just a feast for the taste buds but a visual delight that will send shivers down your guests’ spines. With its oozing, brain-like appearance and rich, savory flavor, this dip makes a perfect creepy snack for your fright-filled celebration. Ready to wow everyone with a ghoulishly delicious treat? Let’s dive into the details!
2. Why You’ll Love This Recipe
- Eye-Catching Presentation: A gross but mesmerizing centerpiece for your spooky spread.
- Quick & Easy: You can whip this up in under 30 minutes, perfect for last-minute party planning.
- Versatile: Pairs well with bread, crackers, or vegetable sticks—flexible for all dietary preferences.
- Gross & Creepy: An ideal creepy appetizer to get everyone talking!
3. Ingredient Notes
The key to achieving the realistic, brain-like appearance of this Wednesday Lurch’s Melted Brain Dip lies in selecting high-quality ingredients. Using fresh, creamy cheeses like cream cheese and shredded mozzarella ensures a smooth, gooey texture. Adding a splash of Worcestershire sauce enriches the flavor and deepens the color, making it appear more grotesque. For the “brain” consistency, gelatin can be used subtly to maintain the shape when chilled. Opt for natural food coloring if you want intense, vibrant hues—just a small amount can make your dip extra creepy.
For more inspiration on spooky treats, check out Wednesday Addams Graveyard Dirt Cups or explore other Halloween ideas on Hollywood Recipes.
4. Kitchen Tools You Need
- Silicone Spatula: Essential for mixing the gooey cheese mixture smoothly without staining your hands, and its heat-resistant feature makes it durable for melting ingredients.
- Cake Piping Bag: Perfect for shaping the brain-like patterns and adding detailed textures to your dip.
- Food Coloring Set: Bright, spooky colors to intensify your creepy dip visually.
5. How to Make Wednesday Lurch’s Melted Brain Dip
Prep the Ingredients
Begin by gathering your cheeses, butter, and seasonings. Bring the cream cheese to room temperature to make mixing effortless. As you prepare your ingredients, your kitchen should be filled with a savory, cheesy aroma.Cook the Base
In a saucepan over low heat, melt butter and cream cheese together until silky smooth. Add shredded mozzarella and stir until melted and bubbly. Incorporate a splash of Worcestershire sauce, salt, and pepper to deepen the flavor and add complexity. When the mixture reaches a creamy consistency, it’s time for the fun part.Shape and Decorate
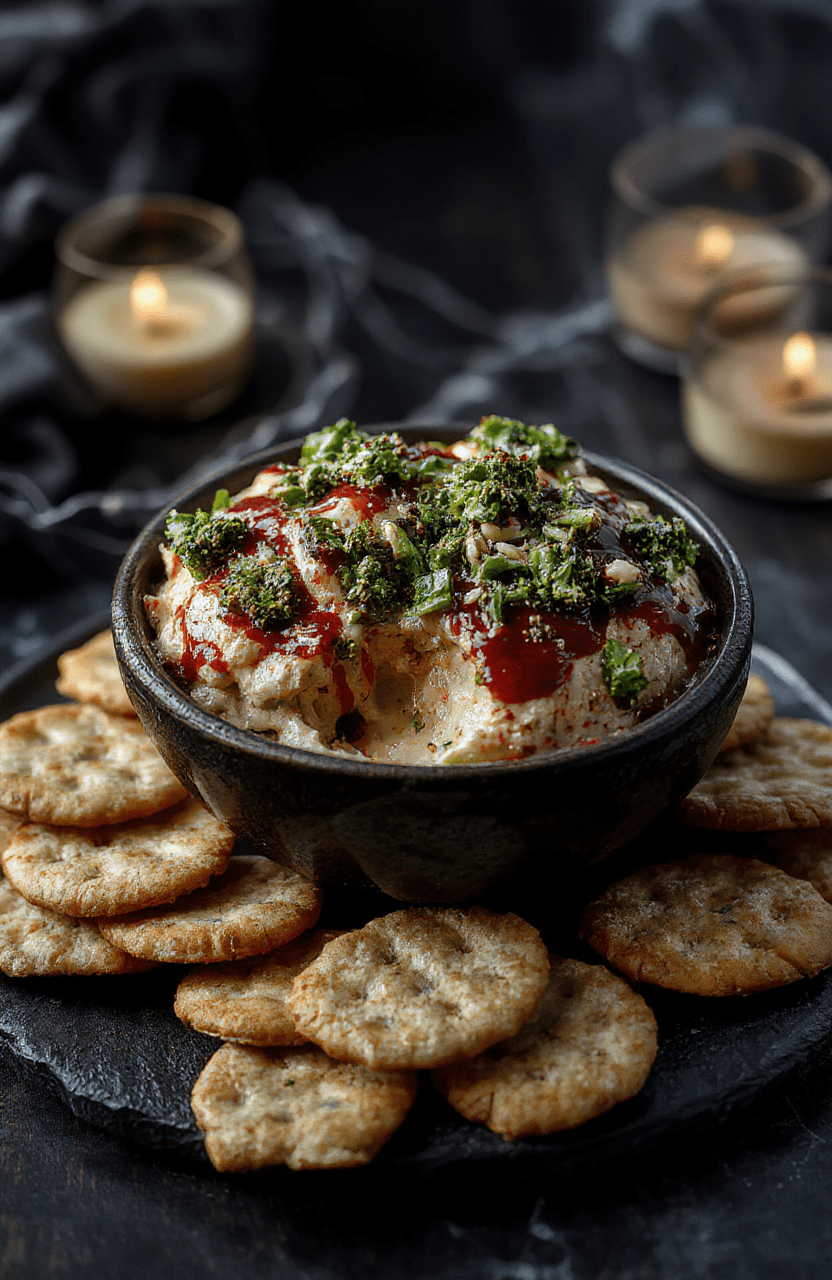
Pour the cheesy mixture onto a plate or shallow dish. Use a spatula or piping bag to create swirling, brain-like patterns—think folds and convolutions that resemble a gross, organic mass. If you want extra realism, add specks of food coloring to mimic veins or blood vessels.Chill and Set
Refrigerate for at least 30 minutes to let the dip set and develop that melted, slightly oozing look. It will become even more terrifyingly realistic once chilled.6. Expert Tips for Success
- Ensure your cheeses are at room temperature for easier mixing and a smoother consistency.
- Use a piping bag or a toothpick to add fine details, like veins or brain ridges.
- If the mixture becomes too thick, gently reheat it over low heat or add a splash of milk to loosen it.
- Chill thoroughly to help the dip hold its shape during party time.
- For extra grossness, add small edible blood vessels using thin red licorice or red food gel.
7. Variations & Substitutions
Want a vegetarian version? Use plant-based cheeses. For a vegan twist, replace dairy cheese with almond or cashew-based cheese and add nutritional yeast for cheesy flavor. If you prefer a milder flavor, tone down the Worcestershire sauce or substitute it with soy sauce. To make it even spookier, add shredded black olives or chopped sun-dried tomatoes for a textured, bloody appearance.
8. Storage & Reheating
Keep any leftover Wednesday Lurch’s Melted Brain Dip refrigerated in an airtight container for up to 2 days. To reheat, gently warm in the microwave or on the stovetop over low heat, stirring constantly until it reaches your desired ooey-gooey state. Avoid overheating to prevent separation and loss of texture.
9. FAQ
Can I make this dip ahead of time?
Absolutely! Prepare and chill the dip a day before your party. The flavors will meld, and it will set into a perfect eerie shape just before serving.
How do I make the dip look more realistic?
Use red or purple food coloring to add veins, and create convoluted, brain-like patterns with a piping bag or toothpick. Chilling the dip helps it become more authentic, oozing and melting at the edges.
What should I serve this with?
It pairs well with crunchy crackers, sliced baguette, or fresh vegetable sticks. For a full gross party spread, combine it with Jack Skellington/Oogie Boogie Brownies or Wednesday Addams Graveyard Dirt Cups.
10. Conclusion
With its gory appearance and delicious cheesy flavor, Wednesday Lurch’s Melted Brain Dip is sure to be a highlight at your Halloween celebration. Whether you’re aiming for a gross, creepy appetizer or a conversation-starting centerpiece, this dip combines visual shock with savory satisfaction. Get ready to amaze and mildly horrify your guests with this unforgettable spooky snack!
Print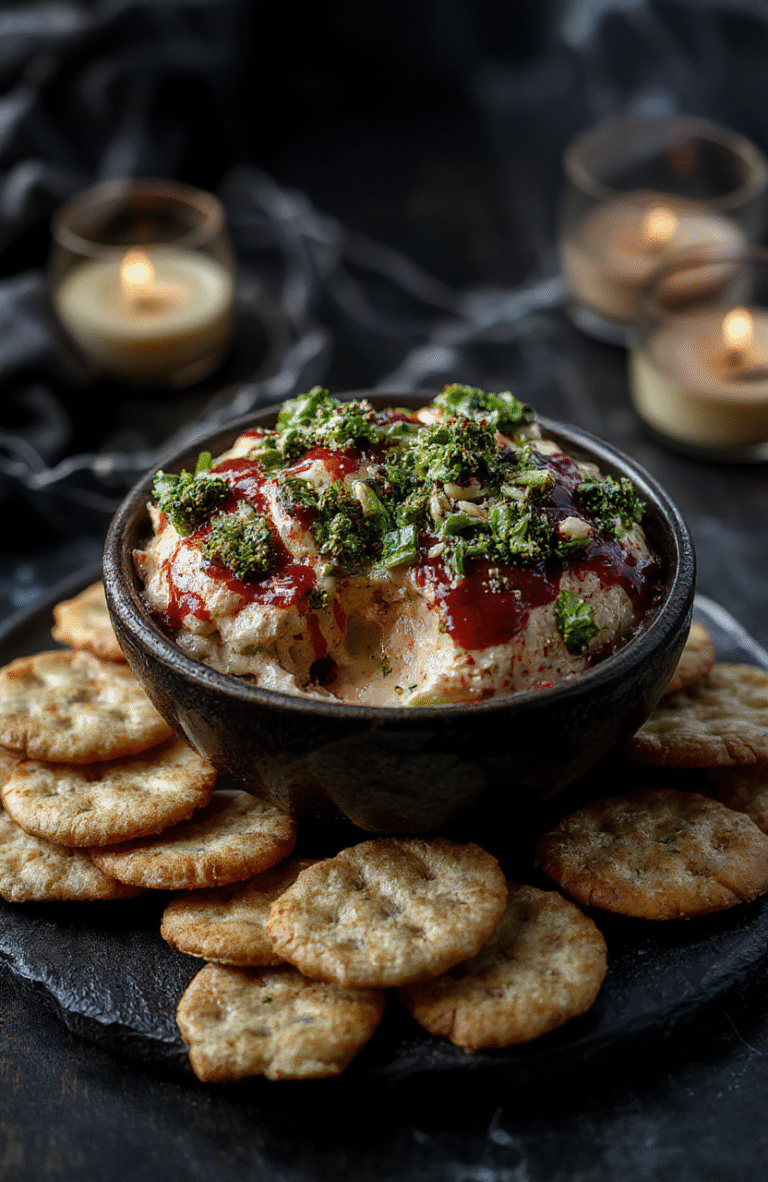
Wednesday Lurch’s Melted Brain Dip
A grossly fun and creepy dip resembling a human brain, made with creamy ingredients, topped with gooey sauces and mold-like toppings for a horror effect.
- Total Time: 10 minutes
- Yield: 8 servings
Ingredients
- 1 cup cream cheese
- 1/2 cup sour cream
- 1 cup shredded mozzarella
- 1/2 cup chopped green onions
- Red food coloring or hot sauce (for blood effect)
- Green food coloring (for mold effect)
- Graham crackers or crispy breadsticks (for crackers)
- Optional: edible eyes or gummy worms for extra creepiness
Instructions
- Mix cream cheese, sour cream, and shredded mozzarella until smooth.
- Divide the mixture into two bowls. Add green food coloring to one, and red food coloring or hot sauce to the other.
- Layer the green mixture in a serving bowl, spreading it out to look like a brain’s surface.
- Drizzle red sauce or hot sauce over the top to create a bloody, melted appearance.
- Add mold-like swirls of green on the surface for a creepy effect.
- Garnish with edible eyes or gummy worms if desired.
- Serve with creepy crackers or breadsticks for scooping.
Notes
- Use food coloring liberally to achieve the gory, gruesome look.
- Chill before serving for best texture.
- Decorate with extra creepy elements like gummy worms or edible eyes for a more horror effect.
- Prep Time: 10 minutes
- Cook Time: 0 minutes
- Method: Mix, layer, chill, serve
- Cuisine: Horror/Party Food
- Diet: Vegetarian
Nutrition
- Serving Size: 1/8 of dip
- Calories: 150 Kcal
- Sugar: 2g
- Sodium: 300mg
- Fat: 12g
- Saturated Fat: 6g
- Unsaturated Fat: 4g
- Trans Fat: 0g
- Carbohydrates: 6g
- Fiber: 1g
- Protein: 6g
- Cholesterol: 30mg
