

Zelda Meaty Rice Balls: Zelda Inspired Rice Balls for Easy Gamer Comfort Food 🍖🍙
1. Introduction
Step into your cozy kitchen after a long quest with Zelda inspired rice balls, the ultimate gamer comfort food. This recipe fuses tender ground meat with fluffy, seasoned rice and a kiss of melty cheese. As they fry, the aroma—garlic, sesame, and soy—draws you in like a victory fanfare. You’ll taste a little bit of adventure in every bite.
2. Why You’ll Love This Recipe
- Ready in 30 minutes. A quick, satisfying snack that feels epic without taking all day.
- One-pan-friendly prep. Sear, then bake—less cleanup, more questing time.
- Customizable fillings. Swap pork for turkey, or add a pinch of chili for a fiery boost.
- Perfect for gaming nights. Bite-sized, shareable, and portable for on-the-go quests.
3. Kitchen Tools You Need
To achieve that crisp exterior and tender interior, gather a few reliable tools. A good nonstick skillet ensures even browning without sticking, while a shallow baking sheet keeps the bottoms perfectly crisp. A sturdy mixing bowl handles the rice-meat mash with ease, and a small scoop or gloved hands help you shape uniform balls for even cooking.
Internal inspiration awaits for other cozy treats and gear you might enjoy alongside these Zelda inspired rice balls: Easy-Sweet Brave Iced Buns, Unlock Disney Villains Cookbook Wicked Recipes, Easy Flaky Disney Spinach Puffs, Magical Harry Potter Aunt Petunia’s Windtorte Pudding, Savory Lord of the Rings Mirkwood Mushroom Tart.
4. Ingredient Notes
Why these ingredients work: short-grain rice clings together, giving a cohesive bite that holds when fried. Ground meat adds savory richness and a slightly crispy edge when seared. A touch of cheese melts inside, creating a creamy center that contrasts with the crisp exterior. Aromatics like garlic and green onions lift the dish, while a splash of soy and a whisper of sesame oil bring a savory umami glow. If you’re short on time, day-old rice saves you from extra prep, and fresh herbs brighten the finish. For a premium feel, choose Japanese short-grain rice and a mix of pork and beef for deeper flavor.
Quality swaps to consider: – Rice: sushi or calrose rice for stickier texture; jasmine for a lighter bite. – Meat: 70/30 ground pork-beef blend or only ground pork for a milder finish. – Cheese: mozzarella for melt, or cheddar for a sharper bite. – Seasonings: a pinch of white pepper, toasted sesame seeds, or minced scallions for brightness.
5. How to Make [Recipe Name]
Phase 1: Prep the rice and meat mixture
Cook the rice until just tender and let it cool slightly. In a bowl, mix the cooled rice with ground meat, a beaten egg to help bind, minced garlic, a splash of soy sauce, and a small handful of shredded cheese. The mixture should feel cohesive but not sticky—like a malleable dough you can shape with your palms.
Phase 2: Shape and coat
Scoop handfuls and roll into compact balls about the size of a golf ball. If the mixture sticks, wet your palms lightly or dust with a touch of breadcrumbs. For extra crunch, roll each ball in breadcrumbs or panko and press gently so the coating adheres.
Phase 3: Sear and finish
Heat a thin layer of oil in a nonstick skillet over medium heat. Fry the balls until the undersides are golden brown and crusty, about 2–3 minutes per side. Transfer to a lined baking sheet and bake at 400°F (200°C) for 8–10 minutes to finish cooking through and set the center. The outside should be deeply browned with a crisp exterior and a juicy center.
Phase 4: Serve
Let cool for a minute, then serve with a dipping sauce of your choice—sweet chili, soy-sesame, or a creamy pepper dip. The aroma should be aromatic and inviting, with a visible sheen of crisp crust and a tender interior awaiting your first bite.
6. Expert Tips for Success
- Keep the rice slightly warm but not hot when mixing to help the binder set.
- Use a binder like an egg or a touch of mayo if your mixture feels too loose.
- Oil the frying surface lightly to prevent sticking without creating a greasy finish.
- Chill the formed balls for 10–15 minutes before cooking to help them hold their shape.
- Do a quick test ball first: if it falls apart, adjust with a bit more cheese or egg.
7. Variations & Substitutions
- Gluten-free option: use gluten-free breadcrumbs for the coating.
- Vegetarian/Vegan: replace meat with finely chopped mushrooms or lentils and omit egg, then bind with a flax egg or unsweetened plant yogurt.
- Cheese-free: use extra dairy-free mozzarella or a dairy-free cheese alternative to maintain melt and texture.
- Spice level: add a pinch of chili flakes or sriracha into the meat mixture for a kick.
8. Storage & Reheating
Store leftovers in an airtight container in the fridge for up to 3 days. For best texture, reheat in an air fryer or oven at 350°F (175°C) for 5–7 minutes until the coating is crisp again. Freeze uncooked balls for up to 1 month; bake straight from freezer, adding a few extra minutes to cooking time.
9. FAQ
Q: What are Zelda inspired rice balls?
A: They are bite-sized, savory meat-and-rice balls inspired by fantasy-adventure vibes, designed for easy, gamer-friendly snacks with a comforting, nostalgic flavor.
Q: Can these be prepared ahead?
A: Yes. Form and chill the balls; fry and bake when ready to serve, ensuring they stay crisp on the outside.
Q: What should I serve with them?
A: A dipping sauce like soy-sesame or sweet chili pairs beautifully. A simple vegetable side or a light miso soup rounds out a complete, cozy meal.
Q: Are they kid-friendly?
A: Absolutely. They’re little, non-spicy, and easy to eat with fingers. You can customize fillings to suit younger palates.
10. Conclusion
These Zelda inspired rice balls bring gamer comfort food to life with a crisp crust, tender interior, and savory depth. They’re quick, flexible, and perfect for sharing during a game night or a casual feast after a quest. Channel your inner chef-adventurer and savor the satisfying bite of this cozy, heroic snack.
Print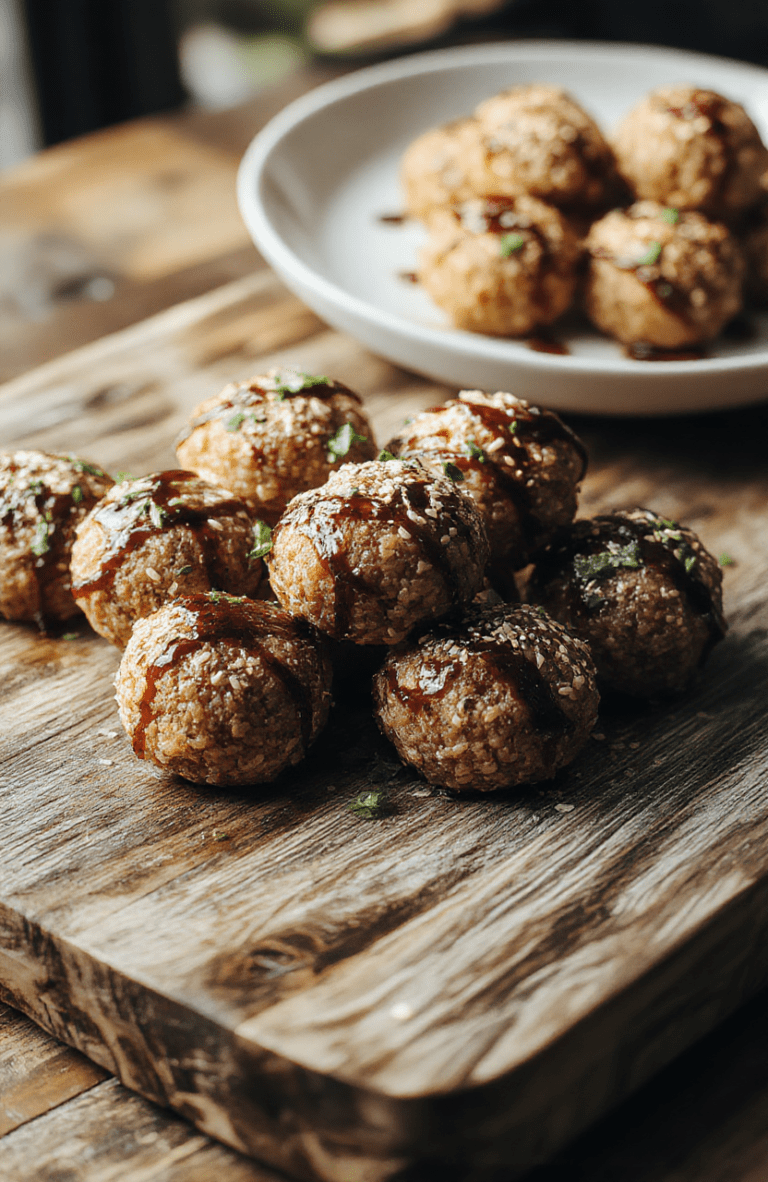
Zelda Meaty Rice Balls: Easy Gamer Comfort Food 🍖🍙
Zelda Meaty Rice Balls are a game-night staple—a fusion bite melding savory ground beef with fluffy rice, seasoned with garlic, green onions, and soy. Pan-seared for a crisp exterior and tender interior, rolled in sesame seeds for crunch. An easy, crowd-pleasing dish for weeknights and gaming marathons.
- Total Time: 40 minutes
- Yield: 4 servings
Ingredients
- 1 cup cooked short-grain rice
- 1/2 pound ground beef
- 2 tablespoons grated Parmesan
- 1 egg
- 1/4 cup breadcrumbs (gluten-free optional)
- 2 green onions, finely chopped
- 1 clove garlic, minced
- 1 tablespoon soy sauce or tamari
- 1 teaspoon sesame seeds, plus extra for rolling
- Salt and pepper to taste
- Oil for frying or baking
Instructions
- In a bowl, mix cooked rice, beef, Parmesan, egg, breadcrumbs, green onions, garlic, soy sauce, sesame seeds, salt, and pepper until well combined.
- Roll the mixture into small meatballs about 1.5 inches in diameter.
- Heat oil in a skillet over medium heat and brown the meatballs on all sides, about 6 minutes, or bake on a sheet at 400F for 12-15 minutes until cooked through.
- Serve with a dipping sauce such as soy-ginger or teriyaki and garnish with extra sesame seeds.
Notes
- Chill the mixture 15 minutes before shaping for easier handling.
- For gluten-free, use gluten-free breadcrumbs and tamari.
- Pair with steamed vegetables or a simple salad for a balanced meal.
- Prep Time: 20 minutes
- Cook Time: 20 minutes
- Method: Stovetop or oven bake
- Cuisine: Fusion
- Diet: Non-Vegetarian
Nutrition
- Serving Size: 1 meatball (60 g)
- Calories: 380 per serving
- Sugar: 2 g
- Sodium: 620 mg
- Fat: 18 g
- Saturated Fat: 6 g
- Unsaturated Fat: 10 g
- Trans Fat: 0 g
- Carbohydrates: 38 g
- Fiber: 3 g
- Protein: 21 g
- Cholesterol: 90 mg
